Visit my Green & Eco Friendly Online StoreThere are many sites out there that explain composting in detail, how to do it properly, how it actually works, all that good stuff. There are also plenty that talk about apartment composting, all the equipment you need, and I'm sure that is all well and good. I've even listed a few below in the related links. But I decided to write this article to explain how
I do it, what I have learned, and the equipment that I use. I am by no means a pro at this, and I'm not even claiming that I know what I'm doing, however I feel like I have been mostly successful with my apartment style composting, and want to share. Obviously if you have a yard you have a huge advantage, however if you are reading this article it is likely that you don't.
It should end up looking something like this
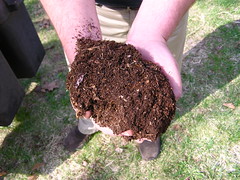
Photo Credit NormanackFirst off, I will say that I am simple, all I use is a plastic bin (actually one of those plastic tote that is used for storage) that I bought from Target. I'm not sure the size, I would guess maybe 5 or 10 gallons. I drilled a couple holes in the bottom for drainage, but have found that it wasn't really necessary as long as you aren't overloading the big. To start, put in some dirt, sand, leaves, newspaper -- anything to line the bottom a few inches. I don't use standard newspaper because of the inks, but it would still work fine. However I do use newspaper from a mailing I get that I know is printed with soy based inks. Make sure that if you are using newspaper you tear it into pieces that are pretty small, nothing bigger than one inch by one inch.
Let me now tell you that I did learn quickly that this simple set up cannot handle all vegetable scraps that I generate. So I have learned what composts quickly and what doesn't, and I stick to using only those. You will figure this out soon enough. When I put too much in it started to stink and get too juicy. Another reason for this was that I didn't have enough green and brown dry matter (ie leaves, grass, etc) in there, so it stayed too wet and the moisture balance was thrown off. It will also help if you keep the food scraps very small. The bigger they are the longer they will take to break down. This means don't drop an entire banana peel in whole, make sure to break it into smaller pieces.
So now you have your container with some lining on the bottom. All you have to do now is put your scraps in, and make sure to cover them up. If you don't, the bin will attract flies and probably won't break down as quickly. Just enough to cover it so there is no exposed food should be enough to keep the flies and the stink away. Something else I do that seems to help the process is to only add scraps once or twice a week, rather than after each meal. With a container you have limited space, and if you add it piecemeal it becomes hard to keep it all covered, and if you have just little pieces of food spaced out all over in my experience it takes longer to break down than if you keep the moist scraps together. It seems to generate more heat this way, break down quicker, and then I can mix it into the bulk sooner. So if you collect scraps for a few days, then add them in and cover them, I would say within a week you can turn the mixture. This will let it aerate and again speed the process. Likely you will feel heat coming off of it, which means that it is working.
This isn't mine, but it should look something like this:
 Photo Credit: You Grow Girl
I had started out keeping it covered thinking it would keep flies away, but I learned that it was unnecessary. Also, I will say that I don't actually keep this bin indoors, so I am able to get away with not keeping it perfectly sanitary. I am lucky to have
some outdoor space where I can keep the bin.
Another thing that I have done, since the container is fairly small and the process ongoing is to keep a second bin for secondary composting. So when part of the bin is nice and dark and starting to look like soil, I scoop that into the second bin where I let the process continue, and in this bin it can dry out and is ready for use in my garden! This keeps the first bin actively composting, and I can always be adding to it.
It may sound confusing, but really there are just a few basics:
- Try to at least 1/3 of the content dry (leaves, grass clippings, etc)
- Always keep wet scraps covered
- Turn mixture every few days to keep the composting process active
It is pretty simple, and you will quickly learn what works for you in your area and conditions. Feel free to share any tips you have. Also, keep in mind that this is just what works for me. I am not a professional.
Related Links:
Labels: composting, environment, garden, how-to, tips


 Digg
Digg Stumble
 Del.icio.us
 Reddit
 Buzz
Buzz Facebook